


Understanding Bicycle Wall Hanger Options
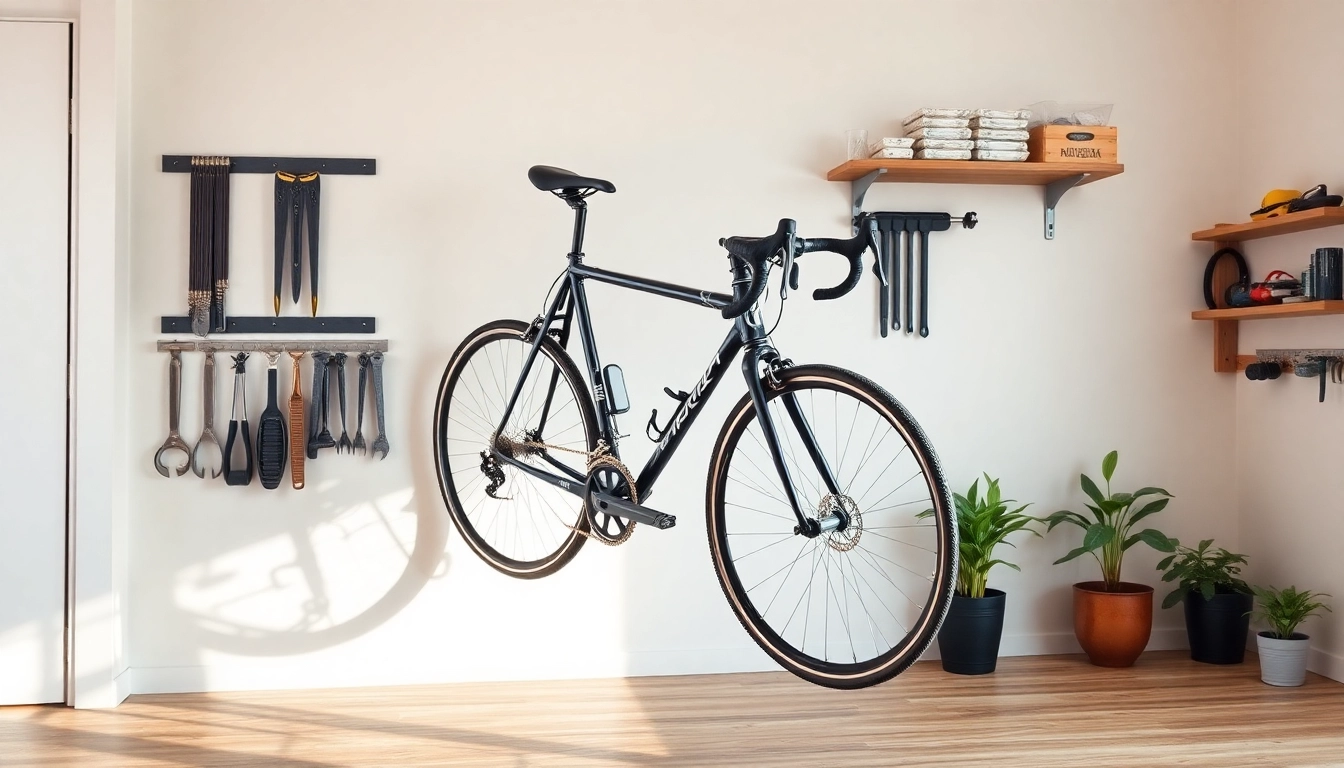
When it comes to storing your bicycle in a limited space, a Bicycle wall hanger is an ideal solution. These innovative storage solutions not only maximize your available space but also keep your bikes safe and secure. Here, we will explore the various types, materials, weight capacities, and much more related to bicycle wall hangers.
Types of Bicycle Wall Hanger
Bicycle wall hangers come in a variety of types, each designed to fit different needs and preferences. Understanding these options can help you select the most suitable one for your space:
- Vertical Wall Hangers: These hangers allow you to store your bike vertically, saving a significant amount of floor space. They are particularly ideal for narrow spaces such as hallways or small apartments.
- Horizontal Wall Hangers: If you have more wall space than floor space, horizontal hangers can display your bike more prominently. Many designs allow for easy access and quick removal.
- Freestanding Racks: While not strictly wall-mounted, these racks provide a versatile option for those who may not want to drill into their walls. They take up more floor space but can be easily relocated.
- Multi-Bike Storage Systems: If you have multiple bikes to store, consider a multi-bike hanger system. These can include racks that hold multiple bikes in a staggered fashion or a series of hooks for individual storage.
Materials and Durability
The materials used in bicycle wall hangers play a crucial role in their durability and performance. Here are the most common materials:
- Steel: Known for its strength and durability, steel is often used in higher-quality wall hangers. It can support heavier bikes and is less likely to bend or break over time.
- Aluminium: Aluminium wall hangers are lighter than steel, making them easier to install. However, they may have lower weight capacities, so they are best suited for lighter bikes.
- Plastic: While more affordable, plastic hangers may not withstand the weight of heavier bikes as well. They are typically used for casual storage and can be a good option for children’s bicycles.
Weight Capacity Considerations
Understanding the weight capacity of your bicycle wall hanger is vital to ensure safety and longevity. Hangers can typically hold between 30 pounds to over 100 pounds, depending on the design and materials. Before purchasing, check the specifications to match your bike’s weight and any additional gear attached. It is always safer to choose a hanger that can support more weight than you expect to carry.
Benefits of Using a Bicycle Wall Hanger
Bicycle wall hangers offer numerous benefits, making them a practical choice for any bike owner. Here’s a closer look at some of these advantages:
Space Saving Solutions
One of the most significant advantages of a bicycle wall hanger is its ability to save space. By hanging your bike vertically or horizontally, you make use of otherwise unused wall space instead of crowding your garage or living area. This is especially beneficial in urban settings where space is at a premium.
Protection for Your Bike
Using a wall hanger not only keeps your bike off the ground but also protects it from potential damages. By hanging your bike, you reduce the risk of scrapes, dings, and dirt that can arise from leaning it against walls or other surfaces. Additionally, many wall hangers are designed to secure your bike in a way that minimizes movement, further protecting your bicycle’s components.
Organized Storage and Accessibility
A bicycle wall hanger creates a designated location for your bike, which contributes to a more organized space. This not only makes it easier to find your bike when you need it, but it also enhances your storage capabilities. With a well-organized setup, accessories like helmets, lights, and tools can also be easily stored and accessed, streamlining your pre-ride preparation.
How to Select the Right Bicycle Wall Hanger
Selecting the right bicycle wall hanger involves considering several factors specific to your needs and available space. Here’s how to make the best choice:
Assessing Your Available Space
Begin by evaluating the space where you plan to install the hanger. Consider the dimensions of the area, including height and width. You should also account for the bike’s dimensions to ensure it comfortably fits without blocking pathways or doorways.
Compatibility with Different Bike Types
Different bicycles can have varying geometries, which may influence what kind of wall hanger will work best. Ensure that the chosen hanger is suitable for your specific bike types, whether they are road bikes, mountain bikes, or hybrid bikes. Check if the hanger has adjustable features or a design that accommodates multiple bike styles.
Style and Design Preferences
Finally, consider the aesthetic aspects of the bicycle wall hanger. Many designs range from modern, minimalist styles to more robust industrial looks. Choose a style that complements your existing décor and reflects your personal taste, as a visually appealing bike hanger can also serve as stylish decor when not in use.
Installation Tips for Your Bicycle Wall Hanger
Installing a bicycle wall hanger can be a straightforward process if done correctly. Here’s a comprehensive guide to ensure a successful installation:
Tools and Materials Needed
Before beginning your installation, gather the following tools and materials:
- Drill
- Suitable drill bits
- Screws (usually provided with the hanger)
- Stud finder (optional, but recommended for heavy bikes)
- Level
- Tape measure
- Pencil for marking
Step-by-Step Installation Process
1. Locate the Wall Studs: Use a stud finder to locate the wall studs where you intend to install the hanger. Mark these spots, as they will provide support for the bike’s weight.
2. Measure and Mark: Use a tape measure to determine the height at which you want to install the hanger. Mark this height with a pencil, ensuring it is level for a symmetrical appearance.
3. Drill Holes: Drill holes at the marked points for the screws, ensuring you hit the wall studs for maximum stability.
4. Attach the Hanger: Position the bicycle wall hanger over the drilled holes and secure it with screws. Use a level to ensure it is perfectly horizontal or vertical, depending on the design.
5. Test Stability: Before hanging your bike, gently pull on the hanger to check its stability and security.
Safety Precautions to Consider
Ensuring safety during installation is critical:
- Wear safety goggles to protect your eyes from dust and debris.
- Make sure the area is clear of obstacles to avoid accidents while using power tools.
- If you’re unsure about handling tools or installation at height, consider asking for assistance from a friend or hiring a professional.
Maintaining Your Bicycle Wall Hanger
To ensure the longevity and effectiveness of your bicycle wall hanger, regular maintenance is important. Here are some key maintenance tips:
Cleaning and Care Tips
Periodic cleaning of your bicycle wall hanger is necessary to prevent corrosion or buildup of dirt from tires. Use a damp cloth to wipe down the hanger and, if necessary, a rust-inhibiting spray for metal parts. Ensure you clean the area surrounding the hanger, particularly if the bike is hung frequently, to avoid dirt accumulation.
Regular Inspections for Longevity
Every few months, inspect the wall hanger for signs of wear or loosening screws. Tighten any loose screws and tighten brackets if necessary to safeguard against accidents. If you notice any signs of damage or corrosion, replace the hanger immediately to maintain safety.
When to Replace or Upgrade Your Hanger
Take time to assess whether your bicycle wall hanger still meets your needs. If you acquire a new bike that differs significantly in weight or frame size, it may be wise to upgrade to a more suitable hanger. Similarly, if the current hanger shows substantial wear or does not function properly, consider a replacement to ensure your bike remains secure and accessible.